DiroDi Trooper M600 User Manual
1. Scooter Assembly Process
1. Remove the holder from the hook by pressing on the rear wing and raise the steering mast.
2. Pull the steering rack forward until it clicks and adjust the height of the steering rack.
3. Connect the contacts according to the marking and ensure that all contacts are inside the steering rack.
4. Insert the steering head into the rack, tighten the bolts using the tool in the box, and turn on the power.
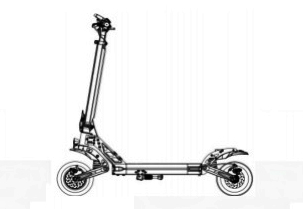
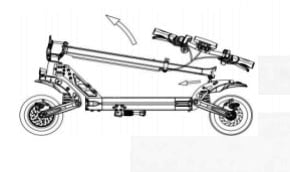
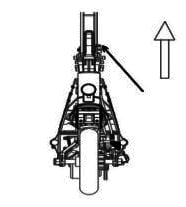
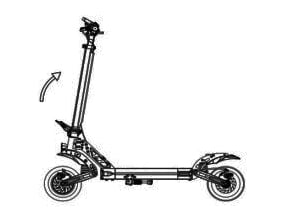
2. Unfolding Steps
1. Push down on the rear wing to release the steering mast hook.
2. Raise the steering mast as shown in the picture.
3. Bring the steering mast forward until it clicks.

4. Make sure that the latch has entered the groove and securely fixed
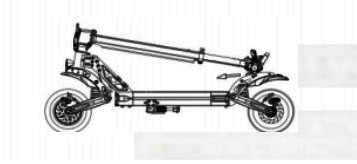
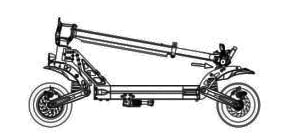
3. Folding Steps
Warning: Power off the scooter before folding
1. Lift the folding hatch up.
2. Then pull it aside.

3. Push the handlebar forward and press the folding lever in the direction of the arrow in the figure.
4. Continue folding until the folding hook reaches and hangs on the bolt located on the rear brake.
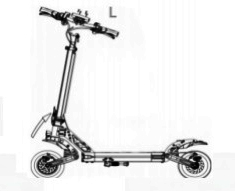
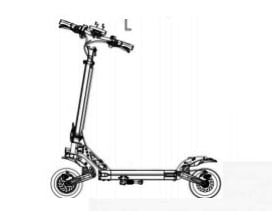
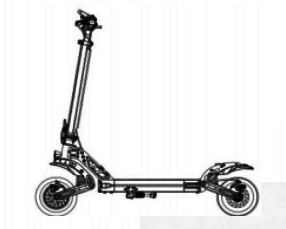
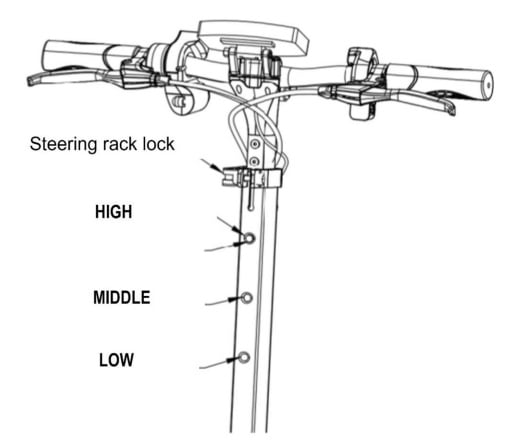
4. Steering Rack
On the front side of the steering rack, there are three slots for adjusting the height of the steering wheel. Please loosen the handlebar retainer and adjust the height of the rack, and then securely fasten the retainer.
5. Charging
1. Open the rubber and insert the plug into the hole
2. Insert the other plug of the charger into the electric outlet
3. When the indicator is red, it shows that the battery is charging
![]()
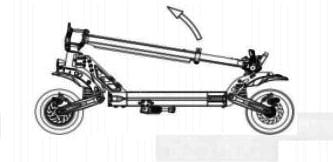
6. Transport
Close and fold the scooter before moving, lifting, or transporting it (as shown in the picture below).
![]()
7. Riding Instructions
IMPORTANT: The laws around the use of electric scooters on public lands, roads and areas vary from state to state. We recommend you always check your local council and road traffic laws prior to using an electric scooter to ensure you are aware of any restrictions that may affect the use of motorized vehicles. Always use appropriate protective riding equipment such as an approved helmet and suitable clothing. This electric scooter is not road legal and can't be used on public roads.
1. This product is designed to be used by one adult only and is not possible to be used by two or more people.
2. Use a helmet and other safety devices (knee pads, etc.) while riding.
3. Don't ride it in unsafe places and don't break traffic regulations.
4. Try learning to ride in an empty place before riding outside.
5. Don't make any dangerous actions when riding or riding with one hand. Keep your feet on the scooter.
6. For your safety, please limit the speed to 25 km/h. Please try to avoid using it at night. If needed, please limit the speed to 15 km/h or less and turn on the headlights.
7. Do not use the scooter when the temperature is lower than -5°C.
8. You must reduce the speed or get off the scooter to pass on rugged terrains.
9. Don't ride it on ground with oil or rice.
10. In order to protect the battery or other electric parts, don't put the scooter into water with a height greater than 4cm and don't spray it with water.
11. In order to avoid unnecessary harm, please don't use it when the weather is bad, such as heavy rain, heavy snow, etc.
12. Adjust the height of the scooter according to your height.
13. Do not ride in bad weather conditions. Keep the scooter away from flammable substances and open sources of fire.
14. Please get off the scooter to navigate through bad terrain conditions.
15. The user should check the limits of use in accordance with the local regulations.
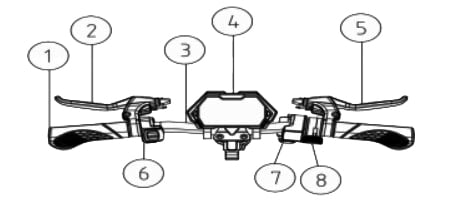
8. Control System Structure
1. Handle bar
2. Left brake handle
3. T-bar
4. LCD display
5. Right brake handle
6. Headlight button
7. Electric lock
8. Gear switch button
9. Button Function
1. Insert the key and turn it to the right to switch on the power.
2. Long press to turn on/off the E-scooter.
3. Press once in a short time to switch to a different gear (default level 1).
4. After startup, press the function switch button three times to enter the menu setting interface.
P1: km/mile - Select Settings, default is km.
P2: Voltage level setting - 36V/48V/52V/60V/72V.
P4: Number of tachometer magnetic poles - range: 1-100, default: 30.
P5: Cruise options - 0 indicates no cruise and 1 indicates cruise.
P6: Zero start, non-zero start settings - 0: zero start; 1: non-zero startup.
P7: Speed limit setting - range: 0-100 percent speed limit.
10. Operation Instruction
Power On
Turn the ignition key to power on. To turn off, return the ignition key to its original state.
Gear Setting
To change gears, use the "power" button next to the throttle lever. 1st gear max 20 km/h (ECO), 2nd gear max 30 km/h (D), 3rd gear (S).
Speed Controller
Smoothly press the throttle lever to set the speed from zero at a complete stop, and even during movement when pushing off the ground with your foot. Control the speed (1-50 km/h).
Brake Controller
Gently press the brake lever to reset the speed.
LED Lamp
Use the special button to turn on the headlights.
Cruise Control
The electric scooter is equipped with a cruise control system. If you keep the speed unchanged for some time, the electric scooter will switch to the cruise mode automatically. To turn it off, please refer to the "button function description" section.
Starting
Stand on the ground with one foot, step on the scooter with the other foot, and slowly press the right throttle. After the scooter starts moving smoothly, stand firmly with both feet on the scooter. Control the speed (1-50 km/h).
11. Riding Operation
1. Turn on the power.
2. Put one foot on the scooter board.
3. Push off with the second foot and gently press the throttle lever to gain speed, then put the second foot on the board.
4. To reset the speed and stop completely, use the brake lever.
5. Do not press the lever sharply, as this may lead to overturning.
To start the cruise control, keep the speed unchanged for a few seconds; the mode will start automatically. After that, you can release the speed lever. To switch off, accelerate with the speed dial lever or gently press the brake lever.
12. Battery and Charger
Each TROOPER-M600 electric scooter is equipped with a special lithium battery and a special intelligent charger. Its accessories have special numbers, please do not use other chargers for charging, as well as other types of products. It is advisable to use our company's charger for charging. If the battery or charger is damaged as a result, the company will not be responsible.
1. Battery
The charger is equipped with an auto-off system when the battery is fully charged. The full charging time is 6-8 hours, except if the battery is damaged as a result of improper charging.
2. Charger
Designed for 800 to 1000 recharges without loss of battery functionality.
13. Dashboard Instruction
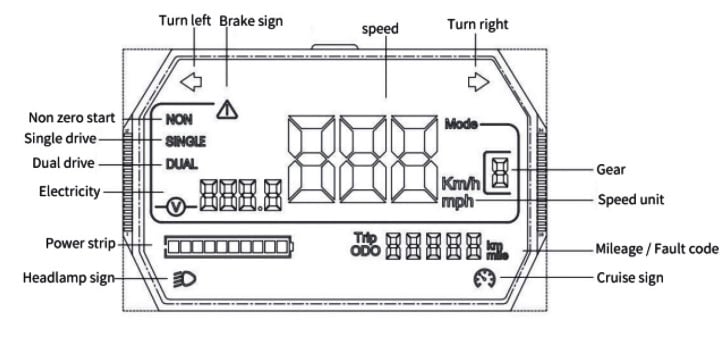
14. Main Indicators Meaning
LED LAMP
- Single click to turn on the lamp
- Lamp indicator is on
- Single click to switch off the lamp
- Lamp indicator is off
Gear Settings:
- First gear
- First gear indicator is on (ECO)
- Second gear
- Second gear indicator is on (D)
- Third gear
- Third gear indicator is on (S)
15. Maintenance
Lubrication:
Folded places need to be lubricated with a few drops of oil every 6 months. Inspect the scooter every 3 months to ensure all screws are fitting well. If the screws are loose, please tighten them.
Battery:
When you get the electric scooter for the first time, please fully charge the battery before using. The battery should be charged at any time to ensure it has power before using the scooter. Please charge the battery once every three months if you stop using it.
Storage:
Do not expose the scooter to direct sunlight or other damp places for a long time. Keep the scooter clean regularly.
16. General Questions & Solutions
1. Black display
Possible cause: The scooter has been exposed to direct sunlight for a long time.
Solution: Put the scooter in a dark place and cover it for a while.
2. The value displayed does not show the correct information.
Possible cause: Incorrect parameter settings.
Solution: Reset the options.
3. The display is opaque or shows unclear values.
Possible cause: Poor contact connection for the battery or the battery is not charged.
Solution: Switch off the power, recharge the battery, and restart the scooter. If the problem persists, contact DiroDi.
4. Complete diagnosis Please check the following steps if the product isn't working:
A. Check if the power is on.
B. Check if the battery is charged or not.
C. Check if the right and left brakes are properly in place.
D. Check if all connections are properly connected. Please contact DiroDi if the product still isn't working.
17. Error Codes
E01: Motor malfunction
E02: Throttle malfunction
E03: Motor or throttle malfunction
E04: The battery is disconnected
E05: Motor or battery malfunction
E06: Battery or speed lever malfunction
E07: Motor malfunction or contact disconnection
E08: Motor is disconnected
E09: Motor malfunction or contact disconnection
E10: Controller malfunction
E11: Motor or controller malfunction
E13: Motor or controller malfunction
E20: Connection break
E30: Controller malfunction or contact break
E31: Controller malfunction or contact break
E40: Brake malfunction
E50: Controller or brake malfunction
E60: Breaking the connection with the brake
E70: Controller or brake malfunction