DiroDi Cavalier T2400 User Manual
1. Safety Instructions
IMPORTANT: The laws around the use of electric scooters on public lands, roads and areas vary from state to state. We recommend you always check your local council and road traffic laws prior to using an electric scooter to ensure you are aware of any restrictions that may affect the use of motorized vehicles. Always use appropriate protective riding equipment such as an approved helmet and suitable clothing. This electric scooter is not road legal and can't be used on public roads.
1. This product is designed to be used by one adult only and is not possible to be used by two or more people.
2. Use a helmet and other safety devices (knee pads, etc.) while riding.
3. Don't ride it in unsafe places and don't break traffic regulations.
4. Try learning to ride in an empty place before riding on the road.
5. Don't make any dangerous actions when riding or riding with one hand. Keep your feet on the scooter.
6. For your safety, please limit the speed to 25 km/h. Please try to avoid using it at night. If needed, please limit the speed to 15 km/h or less and turn on the headlights.
7. Do not use the scooter when the temperature is lower than -5°C.
8. You must reduce the speed or get off the scooter to pass on rugged terrains.
9. Don't ride it on ground with oil or rice.
10. In order to protect the battery or other electric parts, don't put the scooter into water with a height greater than 4cm and don't spray it with water.
11. In order to avoid unnecessary harm, please don't use it when the weather is bad, such as heavy rain, heavy snow, etc.
12. Adjust the height of the scooter according to your height.
13. Do not ride in bad weather conditions. Keep the scooter away from flammable substances and open sources of fire.
14. Please get off the scooter to navigate through bad terrain conditions.
15. The user should check the limits of use in accordance with the local regulations.
16. Please don't try to go directly through steps with a gap of more than 30cm, which may cause the vehicle to overturn. Injury to the driver or damage to the vehicle should be avoided as much as possible for steps below 30cm.
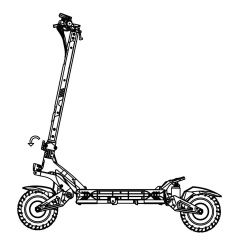
2. Assembly Process
1. Unfold the scooter and open the parking bracket (refer to the 6 unfolding steps) to unfold the scooter.
2. Straighten the body bar and apply forward force.
3. Confirm that the spring pin is back in place and turn the handle to the right to tighten it.
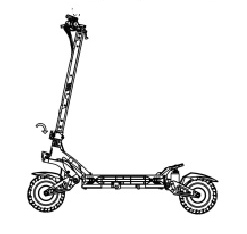
4. Use the tools included in the package to tighten the screws and check if the power switch is working properly after the assembly is complete.
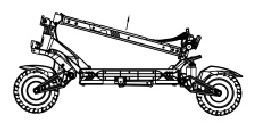
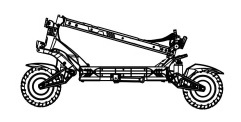
3. Unfolding Steps
1. Press on the hook with one hand and pull up the body bar with the other.

2. Pull the body bar up.
3. Straighten the body bar and apply force forward.
4. Confirm that the spring pin is back in place and then turn the handle to the right to tighten.
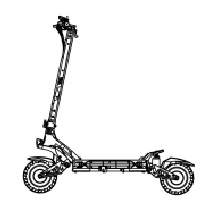
4. Folding Steps
1. Turn the handle to the left (counterclockwise) while holding the pole in your hand.
2. Hold the pole with one hand and pull the spring pin outward with your other hand.
3. Put the body bar down.
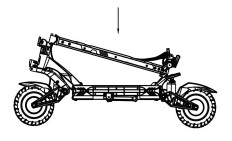
4. Adjust the body bar to make sure the hooks fit into the slot and snap into place.
5. Charging
1. Open the waterproof plug of the charging port and insert the charger connector into the charging hole on the body.
2. Insert the charger power plug into a power outlet.
3. When the indicator light of the charger is red, it means the battery is charging. When the indicator light of the charger turns green, it means the battery is fully charged. Fasten the waterproof plug.
6. Button Function
1. Insert the key, turn the key to the right to power on.
2. Press and hold the function switch button to switch the machine on and off.
3. Short press the function switch button once after power on to switch gears, divided into three gears.
4. Short press the single-drive switch once after power on to switch between single-drive and dual-drive modes.
5. After power on, press the function switch button three times in a row to enter the menu setting interface. The meters P1, P2, P3, P4, P6, P7, P8, Pa, Pb, Pc will be displayed.
P1: km/mile selection setting, default km.
P2: Voltage level setting: 36V/48V/52V/60V/72V.
P3: Wheel diameter: unit, inch; can be set to 080-160 (080 means 8 inches, 100 means 10 inches, and so on), each time increases by 5.
P4: Number of magnetic poles for speed measurement: range: 1-100, default 30.
P5: Cruise selection: 0 means no cruise navigating, 1 is cruising. When the cruise is not turned on, the cruise icon does not light up; when the cruise is turned on, the cruise icon flashes; after the 8S enters the cruise, the cruise icon flashes; the default is not to cruise.
P6: Zero startup, non-zero startup settings, 0: zero startup; 1: non-zero startup, the startup mode will be displayed when starting up (zero startup will not display an icon, non-zero startup will display NON); The accelerator starts directly; in non-zero start mode, you need to slide the car above 5KM/h and press the accelerator to start.
P7: speed limit setting: range 0-100 percent speed limit.
P8: Sleep time setting: 0, no sleep; other numbers are sleep time, range: 1-60; unit minute, default 5 minutes.
PA: Start strength setting: 1-5, 1 minimum, 5 maximum.
PB: Brake strength setting: 1-5, 1-20%, 2-35%, 3-50%, 4-70%, 5-100%.
When P1 is displayed, 0-km or 1-mile will be displayed below, indicating the optional setting of km/mile; long press the power button for 3 seconds, the value will flash; at this time, short press the power button to select 1-mile or 0-km; when 0-km is displayed, select km, and Km/h will be displayed; when 1-mile is displayed, select mile, and mile will be displayed; then long press the power button to exit, and select other parameters for debugging; if there is no operation for 8 seconds, automatically exit the parameter setting (other parameter settings are the same); after entering the menu setting, if the current parameter does not need to be modified, press the button once and switch to the next parameter setting interface, such as the current P1, if you do not need to modify the setting to modify P1, then short press the button once to switch to P2.
7. Password Modification
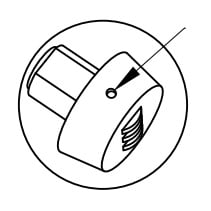
1. The original password is 000. Align the tick marks.
2. Press the hole with a pointed object, then modify the password you want to set, and then release it. The password setting is completed.
8. Basic Operation
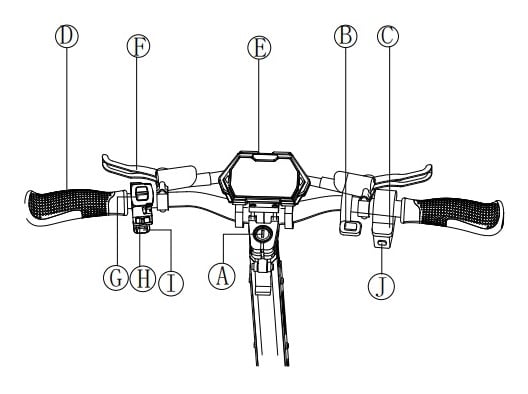
A . Power button
B. Single & double driver switch
C. Throttle
D. Handlebar cover
E. Display
F. Brake
G. Headlight switch
H. Side light switch
I. Horn
J. Function switch button
9. Operation Instruction
1. Turn on and Turn off
Insert the key, turn the key to the right to power on, press and hold the function switch button for 3 seconds to turn on the vehicle, and long press the function switch button for 3 seconds to turn the key to the left to turn off the vehicle.
2. Gear setting
Press the function change button once, the setting range is 1st gear, 2nd gear, and 3rd gear.
3. Brake control
The greater the pressure on the brake lever, the greater the braking force.
4. LED Headlight Switch
In the power-on state, push the headlight switch key up to turn on the headlights.
5. Emergency brake
When encountering an emergency, use your fingers to hold the brake lever tightly. At this time, the rear wheel friction braking can be realized at the same time. Under normal circumstances, please do not use the emergency brake after driving vigorously at high speed to avoid damage. The company is not responsible for the damage caused by riding risk or damage to the rear wheel, and it needs to be repaired at a fee.
6. Cruise control
When entering the cruise control mode, repress the throttle or press the brake to withdraw from cruise control. If you need to turn off the cruise mode, enter the menu setting interface and set P5 to 0.
10. Ride Instruction
Ride Preparation
1. Choose a venue suitable for riding.
2. Unfolding the product according to the unfolding instructions and wear protective gear.
Begin to Ride
1. Insert the key, turn the key to the right to power on. Long press the function switch button for 3 seconds to turn on the scooter.
2. Put one foot on the pedal and another foot on the ground.
3. After turning on, under the zero start mode, press the throttle to turn on directly. Under the Nonzero start mode, you need to slide the scooter over 5KM/H and then press the throttle to turn on. Slowly press the accelerator, and the scooter will move forward slowly. After driving smoothly, put the foot on the ground at the same time, and press the right thumb accelerator. The larger the angle, the faster the speed of the scooter.
Stop
Under normal circumstances, hold the brake lever tightly. The scooter will immediately power off and brake, and the greater the depression angle, the greater the braking force.
11. Battery & Charger
Every Cavalier T2400 Electric scooter is equipped with a lithium battery and a smart charger. Each scooter and its accessories have a special number. Please do not use other chargers to charge, and do not charge other types of products with the company's chargers. The company is not responsible for any damage to the battery or charger caused by this.
Battery
The lithium battery provided with the Cavalier T2400 can be recharged up to 600 times without any change in capacity. After 600 times, the capacity will slowly drop to 80%. With normal use, it can generally be recharged more than 1000 times. The lithium battery can be dangerous when charging, so please charge it outdoors.
Charger
The special chargers provided with the Cavalier T2400 have a charging protection function. When the battery reaches 100% full, the charger will automatically power off. The charging time for the 2A charger is approximately 10 hours, the 3A charger about 7 hours, and the 5A charger about 4 hours. Damage to the battery caused by abnormal factors such as water or collision is not covered by the warranty policy.
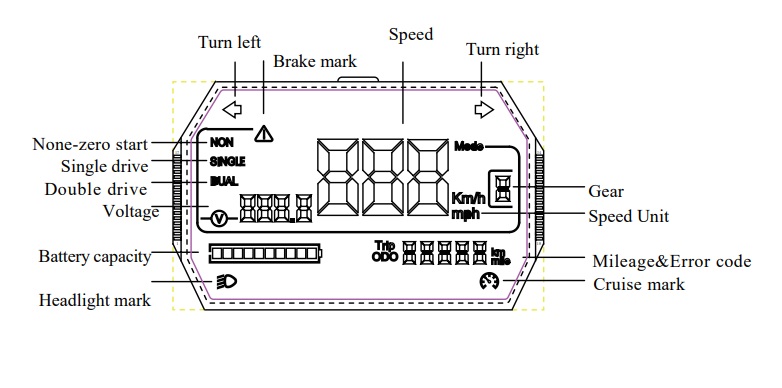
12. LED Display
13. Error Codes
E-001
Error: Rear motor hall fault
Solution: Swap the front and rear motor heads to see if this code still appears. If it still appears, the controller is faulty. Replace the controller and try again; if it does not work, replace the motor and try again.
E-002
Error: Turn handlebar fault
Solution: Try again after changing the throttle.
E-003
Error: Controller fault
Solution: Try again after changing the controller.
E-005
Error: Under-voltage
Solution: The battery is low, try again after charging.
E-006
Error: Receive fault
Solution: It belongs to the display receiving failure, please try again after replacing the display/controller.
E-007
Error: Send fault
Solution: It belongs to the display receiving failure, please try again after replacing the display/controller.
E-009
Error: Controller over-temperature protection
Solution: The temperature of the controller is too high, check whether the controller is fixed/heated well.
E-011
Error: Front motor haul fault
Solution: Swap the front and rear motor heads to see if this code still appears. If it still appears, the controller is faulty. Replace the controller and try again; if it does not work, replace the motor and try again.
E-013
Error: Secondary controller failure
Solution: Try again after changing the controller
E-017
Error: Sub-controller receive failure
Solution: It belongs to the display sending failure, try again after replacing the display/controller.
14. Maintenance
Lubricant
Every six months, you need to add a small amount of white grease or lubricant to the folded part for maintenance. Please check the scooter every three months to see if there are any loose screws. If they are loose, please tighten them.
Battery
When you get the electric scooter for the first time, please fully charge the battery before using it. The battery can be charged at any time to ensure that the battery has electricity. During this period, charging will not cause any damage to the battery. When the battery is not in use, please charge it once every 3 months.
Store and daily care
Please do not leave the scooter in the hot sun or other severely damp places for a long time. Please keep the scooter surface clean.
15. General Problems & Solutions
Possible problems and repair methods
1. Unable to turn on
It may be that the battery is dead, plug it in the charger to charge it, and then press the operation to turn it on and try again.
2. The brakes are relatively loose
It may be that the brake fluid is not enough, add the brake fluid and try again
3. There is a fault code on the meter
Refer to the manual for troubleshooting